Showing posts with label homemade seasonings. Show all posts

Thursday, September 22, 2011

BBQ Chicken Pizza Recipe

Every week, I try to participate in a few recipe hops. When I'm not cooking very much, this is harder to do than at other times. I always find so much inspiration in these hops... of course one of my favorites is my own Friday Potluck.

My favorite hop hosted by someone else is Full Plate Thursday over at Miz Helen's Country Cottage. There are always fantastic recipes, and a great variety of bloggers to be found each week at Miz Helen's place.

A few weeks ago, on September 8, I found a great BBQ Chicken Pizza recipe. Since I still had leftover pizza crusts from my DIY pizza party, in which I trotted out my new Red Star Yeast for this month's Iron Chef Challenge over at A Latte with Ott, A, I figured I'd hit pay dirt with this recipe.

And boy! was I right!

BBQ Chicken Pizza
modified from BBQ Chicken Pie @ 4 Little Fergusons

2  8"-10" pizza crusts or dough (my recipe or yours)
1-2 chicken breasts
1/2 cup bbq sauce
2 small green onions, diced
1-1/2 cups cheddar cheese, shredded
1/2 cup mozzarella cheese, shredded
tomatoes, sliced

I like to work with pre-cooked pizza crusts since it really cuts down the cooking time of the pizzas, and because it's nice to work with existing ingredients. I like to grill my pizza crusts; they then last for about 1-2 weeks in the fridge. However, if you have fresh dough, then you can still use this recipe.

Cook and shred the chicken breasts; I seasoned mine with garlic and rosemary and then broiled on high. Mix the shredded chicken with all but 2 tablespoons of the green onions and barbecue sauce. Spread across the pizza crusts.

Split the cheddar cheese between the two pies and then top with the tomatoes. Finally, top the pizzas with mozzarella.


Cook under broiler for 5-10 minutes until cheese is melted and bubbly.

Enjoy!

Linking this with


Miz Helen’s Country Cottage

Thursday, August 18, 2011

Sweet 'n Tangy Kiwi Dressing & Alaska Salad -- Friday Potluck Recipe Hop #47

One of the only things in the fridge when I returned home was a container filled with kiwi fruit. After pawning some of the kiwis off on various grateful friends, I was still left with 8-10 kiwis. I came to the conclusion that I was going to have to do something with them.

I love kiwis... the fruit, the birds and the people. However, outside of eating them plain, which I had already burned out on, I had no idea what to do with them.

So I did what any sensible lady would do when faced with such a dire dilemma, I turned to Google.

I found a lovely blog That British Woman, which has lots of fun posts.

Back to the matter at hand though -- kiwi fruit! She has a post titled 50 + 1 Recipes for Kiwi Fruit, a round up of some of her favorite kiwi recipes from which I was able to draw wonderful inspiration.


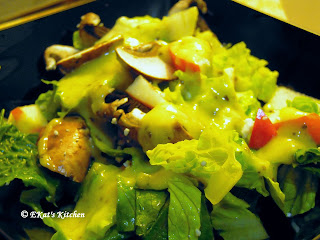
Taking inspiration from recipe number 33, and the contents of my fabulous CSA box, I created an amazing, mainly Alaska-grown salad. The salad didn't feature my mystery veggie, which turned out to be kohlrabi, because I had no idea what to do about it; you can read about my adventures with kohlrabi another day.

However, complete with Alaska red and green leaf lettuce, tomatoes, zucchini, broccoli, carrots, and non-Alaska grown baby bellas, 1/2 apple, and bleu cheese, this spectacular salad goes perfectly with the new kiwi fruit dressing.

Delicious.

Sweet 'n Tangy Kiwi Salad Dressing
as seen here

3 Kiwifruit, peeled and chopped
1 tbsp Grated Fresh Root Ginger
5 tbsp Olive Oil
The juice of 1 Lime
Salt and Black Pepper

Puree all ingredients in a food processor, then add to your salad.

*Note: the original recipe calls for 2 Kiwi and 1 teaspoon of ginger; however the dressing tasted too olive oil-y for me. Adding an third kiwi and the additional ginger made a fantastic flavor, though the dressing was a little thick. This is a keeper.

Enjoy!

In addition to Friday Potluck, I'm pleased to be linking this up to

And now, on to Friday Potluck!

I love all of the recipes that you've been bringing by, and can't wait for this week's edition!

grab the code!


Just a few quick and easy rules for joining the party:

1. Link directly to your recipe (not your main blog).
2. Only one recipe per blog each week.
3. Be sure, in the linked blog post, to link back here to Friday Potluck @ EKat's Kitchen using the button above or text.
4. Have fun, do some visiting and enjoy!

Thanks!

Wednesday, May 25, 2011

Pesto Bruschetta Recipe

One of my favorite things to order is bruschetta... I love all of the tomatoes and balsamic and flavors that mix together. I set out to make bruschetta as an appetizer for myself and K one night, but I went a little overboard on the basil, in part because I had beautiful basil from the supermarket, and in part because I was also going to make pesto to go along with my cremini "marsala" (recipe to come). I just lost track of what I was making at one time.

We ended up with a lovely pesto bruschetta, and it was fantastic. I cheated on the bread pieces, and got pre-toasted bread from Costco. Yum.

Pesto Bruschetta
basil leaves (I filled up the 4 oz bowl of my food processor)
3 tomatoes, skin removed
balsamic vinegar
olive oil
1-2 garlic cloves
bruschetta chips (or make your own with french bread by brushing with olive oil)
freshly grated parmesan

To skin tomatoes, first boil water and remove from heat; immediately place tomatoes in the hot water for one minute.

Remove the tomatoes and you'll see that the skins peel right off.


Next slice open the tomatoes and remove the seeds and cores. Chop roughly.

Fill up your food processor with basil. Isn't it beautiful? I processed the basil first to make more room for the other ingredients, but the end goal is to lump everything but the cheese and the bruschetta in.

Why not? Let's add some cheese to the pesto.

Spoon the pesto over the bruschetta chips and top with a little bit of cheese. Bake at 350 for 8-10 minutes.
Serve and enjoy!

I'm pleased to be linking this up with


Miz Helen’s Country Cottage

Tuesday, February 22, 2011

Low Sodium Sour Cream & Onion Dip

Hi-de-ho Friendly Friends!

One of my favorite things is chips and dip. SO much.

I really love Lipton's Onion Soup mix... so in one of my favorite cook books, I was pleased to find, not only a way to make your own onion soup mix, on the super cheap, but also a smidge healthier. Because its... dundundun... LOW SODIUM!


You heard it here.

Amazing. I love this cookbook, and I urge you to check it out!

The best part of this recipe, other than its supreme yummy factor, is that if you stock up on all the ingredients in bulk, you can
a. make it in bulk to have and to hold for future uses
b. make it super cheap


I love Costco.

Nonetheless. This is a great way to make your own seasoning and save money.

I mixed all my ingredients into a mortar and pestle to grind up some of the larger bouillon chunks. If mixing a larger batch... this may not be possible. (an observation from Captain Obvious)


Low Sodium Onion Soup Mix
from 500 Low Sodium Recipes: Lose the Salt not the Flavor by Dick Logue

1 tablespoon minced onion
1 teaspoon sodium-free beef bouillon
1/2 teaspoon onion powder
1/8 teaspoon black pepper
1/8 teaspoon paprika

Makes one recipe of Onion Soup Mix: about 1.5 tablespoons

Combine all ingredients and store in an airtight jar or bag. To make a dip, combine with 16 oz of sour cream.

Lessons learned in this post:
1. Low sodium is good... though I'm certain the salty chips make up for the sodium saved in the dip. Still good.
2. Don't be afraid to fall in love... with chips and dip, with cookbooks, with Costco, with your significant other. Use your imagination.

Stay tuned for my Giveaway... $35 to CSN... coming next week!

This post is linked up to
Hearth & Soul @ Girlichef
Dr. Laura's Tasty Tuesday
Foodie Friday
Fresh, Clean & Pure @ la bella vita

and my own:


Monday, November 8, 2010

Homemade Chili Powder

Achoo! haaaaCHOOO!

Sneezes rang through our house today.

Yes, today we took our air-dried chili peppers and made our own homemade chili powder spice. 

I will miss Colorado's dry air for the ease at which I can dry just about anything -- basil, cilantro, peppers... and more.


About a month ago, maybe two, we purchased this gorgeous bunch of peppers from the Farmers Market. Gorgeous. But we had no idea what to do with them, so we hung them in our kitchen, where they slowly, but surely dried out. I thought about making a pepper vinegar a la Heather @ Gourmet Meals for Less. But the peppers continued to hang in the kitchen.

Today, I was looking up at them and thought they looked so sad. They really wanted to be eaten. Somehow.

So, K and I decided that it was time to grind them up and make them into a lovely chili powder.

For use seasoning pizzas, steaks, soups, wings... for whatever you please.

This is what they looked like all dried out. Before getting chopped (cue witchy laugh).

We pulled them from the vine and placed them in our mini food processor. So pretty.

So mini though, that it required two batches.


Carefully, and using a funnel, we then poured into these cute little spice jars I got from Bed Bath & Beyond. I made the labels and printed out. The front one got used by someone with greasy fingers before I could take a picture. Oh well.

I must caution you... because this stuff is dried, once it's been ground up, it tends to go airborne. I got some in my nose and couldn't stop sneezing... poor K got some in his eyes. The good news is that though it's super potent, because it's powdered it rinses right off.

Unlike jalapeno pepper burn -- where the oil seeps into your skin and the only cure is baking soda paste + aloe + time. Not that we've ever experienced this in our house. Ha!

I love our little pepper flakes and we're planning to use an inaugural taste on our buffalo steaks tonight!

I'm linking this lovely little home made tasty treat with

ShareThis

Related Posts with Thumbnails