Showing posts with label vegetables. Show all posts

Monday, October 17, 2011

How to Cook Pumpkins and Other Squash

Before last year, I didn't know an acorn squash from a butternut squash from a hubbard squash from a spaghetti squash.

I also had no idea that they were related to pumpkins or that they could often be interchanged with pumpkins.  Nor did I have any idea how to cook them!

Fast forward to Squash-a-palooza 2012.

I'm going to assume that some people are starting where I did, and don't know how to cook a squash. Here is your how to guide... for spaghetti squash, for meatier squashes, and for pumpkins and squash to be made into pies and other sweet treats.

I showed you these photos of my squash bounty from the Farmer's Market a few weeks ago.
From left to right: Sugar Pumpkin, Mini Blue Hubbard, Pink Banana Squash, purple potatoes, Stripetti Squash.
Squash-a-palooza, like it's concert festival forebears, has gone on for more than just one day.

Day 1 featured spaghetti squash and pink banana squash.
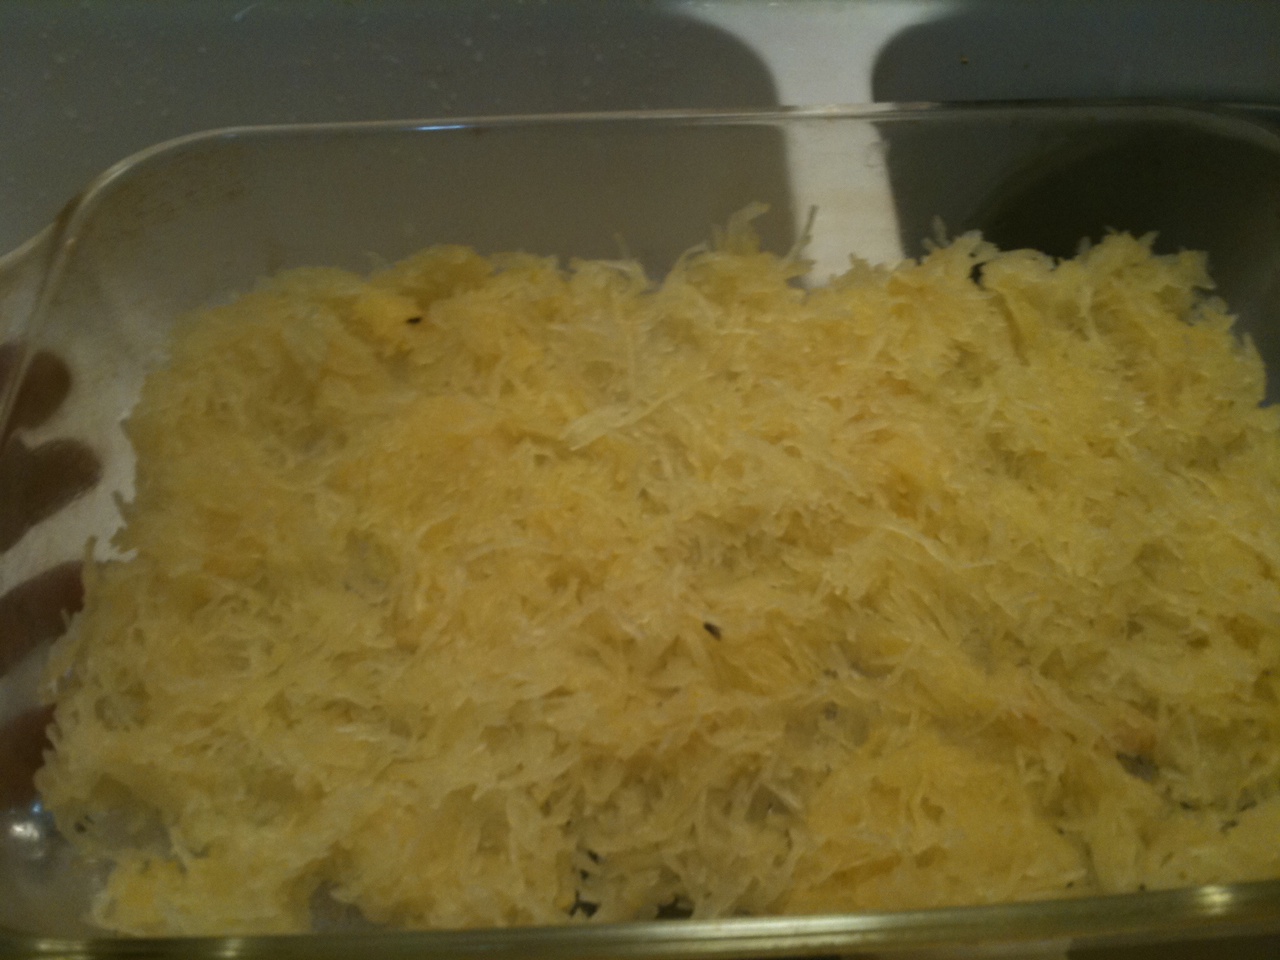
Though spaghetti squash can be baked, my favorite way to cook it is by boiling; this makes the "noodles" less crunchy and softer... and therefore is a great way to make the squash serve as a gluten free replacement for traditional pasta.

To boil spaghetti squash, make fork holes in the squash, plop the squash in a large pot of water and boil on high heat for at least an hour. Make sure that your squash rotates in the water, otherwise you'll end up with half soft noodles and half a little crunchier. After allowing to cool, slice in half and scoop out the seeds and fibrous innards (be sure not to take too much out, as the "noodles" will be easily scooped out with the innards). Then drag a fork through the meat to create noodles. Either set aside for dinner, or place in freezer bags and freeze for use later.

Pink Banana Squash - weighing in at 23 pounds!


I know I showed you this banana squash, but it's truly a beast and deserves to see the light again. Twenty-three pounds of squash!!! Though the farmer offered to sell me this baby in chunks, I wanted to buy the whole thing so I could stock up my freezer. K won't let me buy more squash now. :( Understandable, but still makes me sad. I could eat and buy and prep squash for ages!!

This baby got chopped into half, and then half again, and then half yet again! Yes ... eighths. It was that monstrous. How do you cut a giant squash in half? VERY CAREFULLY!

As the chunks of squash became manageable, I then scooped out the goop and seeds from the center. I saved the seeds for roasting, and then forgot about them in the oven. Whoops!

To cook this monster, and most other squash, season the "meat" with salt and pepper, or whatever other seasonings you want, (or you can skip the seasoning step altogether if not sure what you'll be using the squash for), and then place meat-side down in a lightly greased baking dish.  Bake at 350 degrees for about an hour or until squash meat is very tender and can be easily pierced with a fork.

Pull out and cube, setting aside for your dish of choice, OR place in freezer bags to freeze and then cook later. If freezing, it's worth noting that your squash upon thawing may be best suited for use in soups or purees.

Fast forward a few weeks, when I was ready to tackle squash again. It really did take a while! The 23 pound banana squash and two giant spaghetti squash took a lot out of me! It's now time to bake some sweet treats using the sugar pumpkin.


What's a sugar pumpkin? Honestly? I have no idea. It's a small pumpkin that came to us very green. After several weeks on the counter, it turned a brilliant orange and just screamed to be turned into something delicious. I've been watching Pinterest and Friday Potluck for the best pumpkin sweet treats on the net and opted for Pumpkin Cheesecake Cupcakes from Little Rays of Sunshine and Spiced Pumpkin Chocolate Chip Cookie Bars from From Apples 2 Zucchini. Watch for my versions of the recipes to come soon.


How to cook a pie pumpkin or sugar pumpkin.
Slice the top off and then slice in half. Enjoy the beauty of a gorgeous pumpkin. Scoop out the pulp and seeds. If you wish to save the seeds, you can do so (rinse the seeds and dry with paper towels, then spread out in a single layer of a cookie sheet, seasoning with salt and pepper and put in oven on low heat for a few hours... be sure to check regularly!)


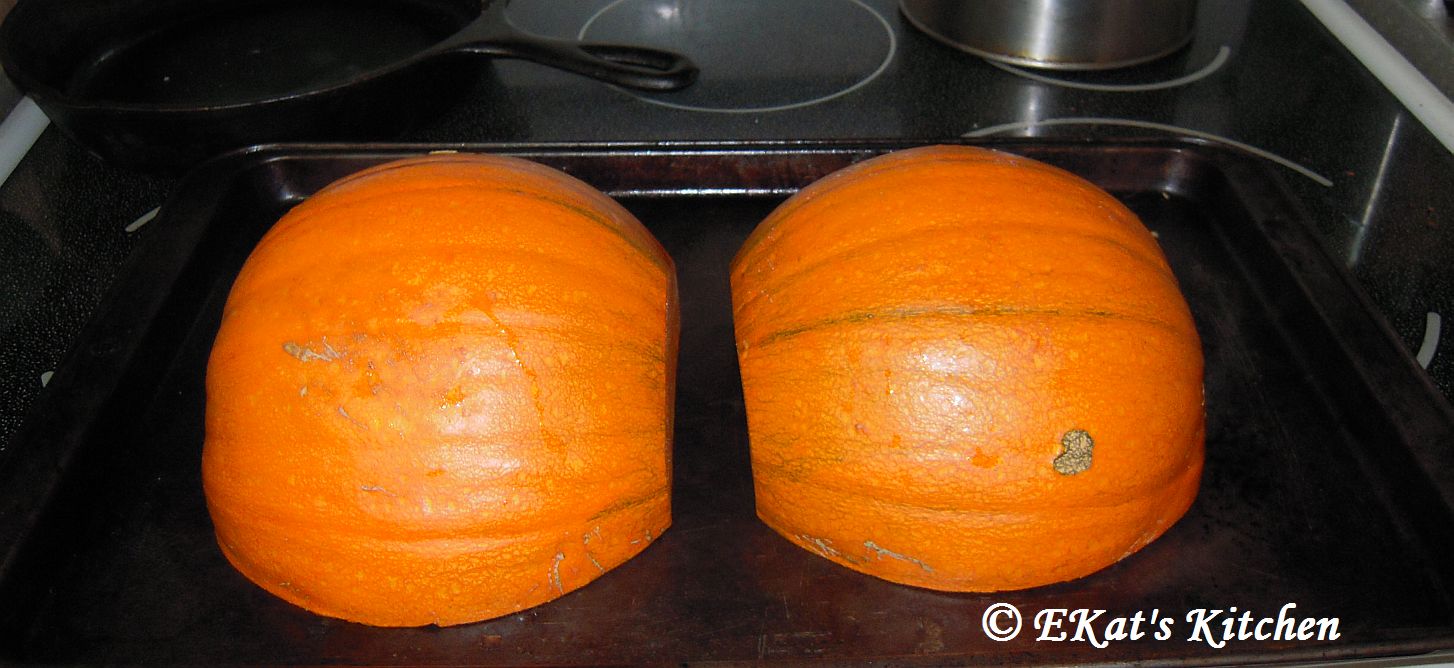
Place the pumpkin halves meat side down on a cookie sheet and cook at 350 degrees for about an hour until the meat is tender and can be easily pierced with a fork. Scoop the meat from the shells and push through a sieve to reduce the amount of water in the pumpkin. Then place in a food processor and process until smooth. Set aside and start cooking!!

Enjoy!

Tuesday, October 4, 2011

Lentil Chili (Vegetarian): Recipes on a Budget


I just love lentils! 

I've been craving them for the last week or so. So last week (before the great Facebook fandango), I posted on my wall asking for your favorite recipes. The lovely Rhonda Cunningham-Phillips responded with this fantastic lentil chili.


I planned to make it several times, but finally did it tonight! And wow! What an amazing dish.

As Rhonda says, "This is a great vegetarian chili to prepare than standard chili because lentils cook quickly." 


It's thick and tasty and... the piece de resistance -- vegetarian, yet it keeps the meat eaters happy! Not to mention, it's really fast!

Though we've only made/had once time, this chili is easily a favorite of mine. Quick, delicious and healthy! I'm in love.

Lentil Chili
modified from a recipe by Rhonda Cunningham-Phillips

INGREDIENTS:
4 cloves garlic, minced
2 medium onions, chopped
1 small Jalapeno or cayenne pepper, minced
1 TBSP. olive oil
3 cups brown lentils
6 cups water
2 tsp. ground cumin
1 tsp. ground coriander
2 tsp. chili powder
1 tsp. paprika
1/2 tsp. allspice
1/2 tsp. thyme
3/4 cup tomato paste
1 small can V-8 or tomato juice
2 TBSP. red wine vinegar (I used apple cider vinegar)
1 tsp. granulated sugar
1 large Red Bell pepper, chopped (I omitted due to lack of availability)
2 stalks celery, chopped (I doubled due to the lack of bell pepper)
Salt & pepper to taste


You can also add some toppings: grated cheese, green onions, sour cream, cilantro or parsley

INSTRUCTIONS:
Saute' garlic, onion, and hot pepper in oil. Add lentils, water and spices. Simmer for 25 to 30 minutes in a covered pot until the lentils are tender. Add tomato paste, juice, vinegar, sugar, red pepper, and celery. Add salt, pepper, and additional water if needed. Simmer for another 15 to 20 minutes until vegetables are tender. Serve with brown rice.


YUM! 

I'm proud to enter this into Miz Helen's Chili Cookoff!

Miz Helen’s Country Cottage

Tuesday, September 27, 2011

Grandma's Sweet and Tangy Tomato Dressing

Tomatoes.

Are.

The.

Best.

Period!

I'm incredibly jealous of all of you who have been sharing lovely tomato recipes. From your bushels of tomatoes that grow so lovely in your yards. I really really miss going to the Farmers' Market in Colorado Springs and coming home with 25# of tomatoes.

Tomatoes and Alaska are not the best of friends... unless a greenhouse is involved.

With all of the recent tomato bounty posts that have been flying around BlogLand, I did what any jealous self-starting cook would do -- pulled myself up by my bootstraps and made the trip to Costco. Typically my tomato adventures start at Costco. Oh! How I love Costco.

Proudly walking in my front door with a few small containers of tomatoes, the wheels started turning.
 
My grandmother's tomato dressing is simply amazing. Sweet and tangy, with absolutely no nutritional value whatsoever, it's the best thing that happened to tomatoes ever. It's so easy to make too. To call it a tomato dressing is a bit of a misnomer, since there are no tomatoes in the sauce; rather, it's what you put on tomatoes to enjoy!
 
I've also found that it's quite stunning on baked breaded chicken. Stunning.
 
Eating the dressing on tomatoes is really the best part though. Really. It will make your taste buds sing.

And your tomatoes will disappear.

A bowlful of  delicious dressing with some gorgeous
yellow heirloom tomatoes. MMMMM.


Grandma's Sweet & Tangy Tomato Dressing
 
4 teaspoons French's prepared mustard (the yellow stuff)
4 Tablespoons sugar
2 Tablespoons white vinegar
2/3 cup vegetable oil
dash of salt
dash of paprika
 
Mix sugar, salt, paprika and mustard in blender. Add vinegar. Turn on blender. Add oil slowly, one tip of the measuring cup at a time (about 10 small blips of the cup). Beat until mixture is thickened to your preference.
 
Serve immediately or refrigerate and serve.

Tuesday, September 13, 2011

Pete's Creamy Coleslaw

One night, early this summer, I was at my parents' house for dinner. Mom had made some amazing coleslaw, and I just HAD to get the recipe so I could make it for myself. I'm in love with this dish in so many different ways, I can't begin to describe the light flavor, the sweet and tangy twist of the pineapple, and the overall amazing-osity of the slaw.


Mom told me this came from a long-held time-honored tradition of cooking in the household - The Jack Daniels Old Time Barbeque Cookbook by Vince Staten. This book has been the source of many a delightful dinner and even more requests for recipes from family and friends. I am but one in a long line of people who've fallen in love with the recipes in this book.

Pete’s Creamy Coleslaw
modified from the Jack Daniels Old Time Barbeque Cookbook

Dressing
5 oz can evaporated milk
¼ c apple-cider vinegar
2 T sugar
1 t salt
¼ t celery seed
¼ t pepper
½ c mayonnaise
Mix all together (fits in a 1 cup measuring cup and use a wire whisk) and pour over
the following in a big enough bowl to stir everything up.

Salad
4 c shredded cabbage ( I usually use 1 large head of cabbage for this amt of
dressing)
1 medium carrot shredded / grated
1 rib celery diced
1 can of crushed pineapple, drained.


I typically mix the dressing in a separate large bowl.

Then, using my most favorite-est kitchen tool, the food processor, I cut the other large ingredients into small chunks and feed through the cheese grater function to get little shreds of cabbage, carrots, and celery.

Mix dressing and salad together and serve.

Mom's advice: "This is very good right away, and even better if it has several hours in the
refrigerator prior to eating.
"

Mine doesn't always make it to the fridge first...

Proudly sharing this with


Miz Helen’s Country Cottage

Thursday, August 18, 2011

Sweet 'n Tangy Kiwi Dressing & Alaska Salad -- Friday Potluck Recipe Hop #47

One of the only things in the fridge when I returned home was a container filled with kiwi fruit. After pawning some of the kiwis off on various grateful friends, I was still left with 8-10 kiwis. I came to the conclusion that I was going to have to do something with them.

I love kiwis... the fruit, the birds and the people. However, outside of eating them plain, which I had already burned out on, I had no idea what to do with them.

So I did what any sensible lady would do when faced with such a dire dilemma, I turned to Google.

I found a lovely blog That British Woman, which has lots of fun posts.

Back to the matter at hand though -- kiwi fruit! She has a post titled 50 + 1 Recipes for Kiwi Fruit, a round up of some of her favorite kiwi recipes from which I was able to draw wonderful inspiration.


Taking inspiration from recipe number 33, and the contents of my fabulous CSA box, I created an amazing, mainly Alaska-grown salad. The salad didn't feature my mystery veggie, which turned out to be kohlrabi, because I had no idea what to do about it; you can read about my adventures with kohlrabi another day.

However, complete with Alaska red and green leaf lettuce, tomatoes, zucchini, broccoli, carrots, and non-Alaska grown baby bellas, 1/2 apple, and bleu cheese, this spectacular salad goes perfectly with the new kiwi fruit dressing.

Delicious.

Sweet 'n Tangy Kiwi Salad Dressing
as seen here

3 Kiwifruit, peeled and chopped
1 tbsp Grated Fresh Root Ginger
5 tbsp Olive Oil
The juice of 1 Lime
Salt and Black Pepper

Puree all ingredients in a food processor, then add to your salad.

*Note: the original recipe calls for 2 Kiwi and 1 teaspoon of ginger; however the dressing tasted too olive oil-y for me. Adding an third kiwi and the additional ginger made a fantastic flavor, though the dressing was a little thick. This is a keeper.

Enjoy!

In addition to Friday Potluck, I'm pleased to be linking this up to

And now, on to Friday Potluck!

I love all of the recipes that you've been bringing by, and can't wait for this week's edition!

grab the code!


Just a few quick and easy rules for joining the party:

1. Link directly to your recipe (not your main blog).
2. Only one recipe per blog each week.
3. Be sure, in the linked blog post, to link back here to Friday Potluck @ EKat's Kitchen using the button above or text.
4. Have fun, do some visiting and enjoy!

Thanks!

Tuesday, June 7, 2011

Low Carb Portabello Burgers w/ Kidney Beans

Ready for an incredibly tasty burger?

I was too! I'm doing a cleanse - the Advocare 24 Day Challenge - so I haven't been cooking a whole heck of a lot. That's why you haven't seen too many posts from me recently... that and life has been C-C-C-razy!

I've been craving pasta like you wouldn't believe. A visit to the grocery store today for a few needed items, had me gasping over the chip aisle. I prevailed though. Here's a tasty treat that's nutritious, filling and delicious!

I originally found the recipe on e-How and ended up making several adjustments. I can't find it again for reference, but this is a really tasty treat.

1 14 oz can kidney beans, no salt added, drained and rinsed
1 medium carrot
1 cup portabello mushrooms, chopped
1/2 onion
1/2 large orange or yellow pepper (or one whole small), seeded
1 cup panko bread crumbs
1 egg
2 tbsp ketchup
1 tbsp garlic powder

6 small slices tomato
3 large leaves romaine lettuce
horseradish dijon

Using a food processor, shred your carrot. Add the beans and all other ingredients, except the tomato and lettuce.The original recipe calls for the mix to cool for an hour, but I was hungry, so I just split into six patties and broiled for about 5 minutes on each side.

Plate up on half a lettuce leaf, topped with a small amount of horseradish dijon and a small slice of tomato.

Enjoy!

Linking this up to:


Miz Helen’s Country Cottage

Wednesday, April 20, 2011

Grilled Baby Bok Choy

I love my CSA! I love my CSA! I love my CSA!

I've already clicked my black, white and hot pink peep toes (as I don't own ruby slippers) three times and found myself back home in Alaska. There really is no place like home. And, the house we bought two months ago is feeling more like home every day.

Over the last several weeks, the snow has melted from the deck and the yard, and I've learned just how much grass grows in a year (the house was vacant last summer). Daylight is increasing ... I forgot how much I loved sun all day long--when it's sunny. I can't wait to start a little garden out back, after our landscaping is done, and start growing some veggies of my own.

I really do love my CSA. I haven't bought much in the way of produce since starting to get the boxes every other week, except for the occasional filler ingredients, and the blessedly NOT local mangos for my beloved mango salsa.


Last box, these cute little guys appeared. It took me quite a bit of searching to figure out what they were. Baby Bok Choy. I've had grown up bok choy before in an Asian Slaw Salad... but had never tried the mini-me versions.

As we were also grilling steaks (by we, I mean K, as I am not entirely comfortable with the grill), I got out our lovely new grilling pan.


We chopped these Babies in half, sliced two cloves of garlic and tossed with olive oil and a dash of sea salt.

After grilling for about 5-10 minutes, we served, drizzling with rice wine vinegar. YUM!

I love my CSA.

Grilled Baby Bok Choy
3-4 "heads" baby bok choy
2 cloves garlic, sliced
olive oil
sea salt

Separate the bok choy leaves and wash. Chop in half and toss with remaining ingredients. Place in grilling pan and grill for about 10 minutes.

Enjoy. Serve with rice wine vinegar.

This post is linked with

MyMeatlessMondays

Saturday, March 12, 2011

Spaghetti Squash & Ruby Chard Lasagna

K and I were finally both at home and with energy simultaneously... and we got the final box out of our downstairs! We reorganized the furniture and hung pictures... and it's boo-ti-ful. A few odds and ends and clutter to find homes for still, but it's coming together so nicely!

With that huge success behind us, I thought we should celebrate! By celebrate, I mean cook at home, and by cook at home, I mean another fabulous experiment with the CSA veggies.

I've had some awesome spaghetti squash in the freezer that I cooked and made into "noodles", just like I did when we made eggplant parmesan over spaghetti squash last fall. Cooked squash "meat" keeps really well frozen if your physical squashes are nearing the end of their storage lives. Though I've found that I love my garlic sauteed rainbow chard, since I've gotten a chard bunch each week from Glacier Valley CSA, I've been wanting to try some new ways to eat it.

Born of ingredients in the fridge, my creative juices, and my husband's input, I give you a fantastic meatless meal... one even approved by K, the penultimate carnivore. To his credit, he only once suggested adding meat, and this was early in the planning stages. We added lots of cheese in homage to his Wisconsin-cheese-loving roots, and to give a nice meaty texture and earthy flavor, we added some sliced crimini mushrooms. Though the final product was a bit on the juicy side, it was fantastic... a wonderful success.

Spaghetti Squash Chard Lasagna
(printable recipe)

1 large spaghetti squash, baked, "noodled" and cooled
1 large bunch chard (ruby)
2 cloves garlic thinly sliced
4 tbsp vegetable oil, separated
1 16 oz tub cottage cheese
1 lb mozzarella, shredded
6 medium crimini mushrooms
6 Roma tomatoes, diced
1 cup crumbled feta

If you don't have frozen spaghetti squash, it's best to bake your squash ahead of time and "noodle," then set it aside to cool. It's much easier to work with when it's not scalding.

Rinse the chard, slice off the stems and slice out the center ribs and set aside; next slice the main leaves into large chunks -- about 2" wide. Slice the garlic and cook in pan with vegetable oil until golden. Just as in Sauteed Garlic Rainbow Chard, add the sliced leaves a handful at a time, until slightly wilted. Set aside. Now saute the stems until crispy. Turn off heat in pan and begin your lasagna.

 
In a 13 x 9 greased pan, first layer 1/2 the spaghetti squash. (While I await the unearthing of my camera charger, I sadly am limited to photos from my phone... some good... some less so. My apologies)

 
Next is the chard; unfurl the wilted leaves (1/2) and spread across the squash.

Add in the cottage cheese. All of it.

Repeat the squash and kale layers. Cover with the sliced mushrooms. I wanted to dig in right here without the rest of the toppings and without cooking it. It looked SO pretty with these babies.

Next, cover the sliced mushrooms with 3/4 of the mozzarella, reserving the remaining quarter for the very top. Cover the mozz with the chard stems and the diced tomatoes, finally covering the top with the mozz and feta.

Cook in preheated 350 degree oven for 30 minutes; if your oven cooks unevenly, cook for 25 minutes and then turn for remaining five.

Serve. Super yummy and husband-approved. The mushrooms really make this dish! Because it's a little on the juicy side, the final picture doesn't do this dish justice!

This is linked up with Meatless Mondays/

http://amoderatelife.com/
”Hearth

Wednesday, March 2, 2011

Broccoli & Oyster Mushroom Stir Fry w/ Soy Ginger Coconut Chicken

Is that title a mouthful or what?!?!? I tried to shorten it and make it catchier, and failed miserably. Short of coming up with an acronym, with a ton of consonants that sounds like you're speaking with a mouthful of marbles.


I haven't been able to stop talking about my CSA box. I'm not yet sure if it's a good deal dollarwise, but it is fantastic in terms of introducing me to new ingredients!

The lovely ladies of Glacier Valley CSA have been so kind as to provide several recipes for their tasty treats! Tonight's fantastic stir fry was based on one of their recipes.

Tonight's fantastic chicken is another story; it grew out of a series of delicious thoughts. A marinade and a search for a crunchy, sweet texture.

Together, the flavors and textures combined for a dish that was spectacularly delicious; and my first experience with oyster mushrooms was a screaming success.

I'd never seen oyster mushrooms before.
They're kind of funny looking. But their flavor is amazing... light and easy to enjoy.

Broccoli & Oyster Mushroom Stir Fry
modified from Glacier Valley Farms

1-2 cups sliced oyster mushrooms
2 cups broccoli florets
1 tbsp peanut oil (I substituted vegetable oil)
2-3 cloves garlic, minced
1 small onion (I used two shallots)
Optional: 1 small can water chestnuts, diced


Though the recipe calls for the onion (shallots) to be sliced into small wedges, I opted to thinly slice them to add a bit more crunch to the dish.


Heat the oil over medium-high heat and saute the onions for about a minute.


Add the broccoli and a teaspoon of water and then cover immediately to steam to broccoli for a few minutes. After removing the lid, allow the remaining water to cook off.

Then add in the mushrooms, garlic and water chestnuts, cooking until the mushrooms are tender.

Soy Ginger Coconut Chicken

Marinade
1/4 cup rice vinegar
1/4 cup soy sauce or braggs
1 tbsp sesame oil
1 tbsp ginger, minced
2 large chicken breasts, cut into 1" cubes

Combine all ingredients and marinate chicken in refrigerator overnight.

Breading
1 cup Panko bread crumbs
1/2 cup shredded coconut
several cups frying oil

Ponzu sauce for drizzling.


Stir together Panko crumbs and coconut.

Remove chicken from marinade and coat with Panko/coconut mix. Heat the oil in large, deep pot until rippling.


Drop several pieces of chicken in at a time and cook until a deep golden brown. Remove with tongs and set aside on paper towel to drain.

Serve with Broccoli Oyster Mushroom stir fry over brown rice. Drizzle with Ponzu sauce for an additional citrus flavor.

Don't forget to enter my giveaway!!

I'm linking this recipe up with:

ShareThis

Related Posts with Thumbnails